December 24, 2012

Child's Apron


Two more days for X'mas...
I have this friend that has two boys & 8yr-old girl.
I originally bought movie tickets for their x'mas gifts, but today, two days before x'mas, my DH said "that's what they're gonna get for x'mas?"
(he always does this!)

So I went out to get a toy gift for the boys, and nothing for the girl because I can make some cute tote bag for her real quick.

Then I realized, I was already planning to give her the bag as a favor to my kids bday party for next month.
I don't wanna double up so I need to come up with something quick to make in next two days...
(i don't want to go out shopping anymore!)

This is what I posted on the PR thread, asking for any gift ideas...
I like the idea of an apron, and I managed to make two in two days.
I made one for the 8-yr-old girl, and another for a 4yr-old that we'll be seeing tomorrow for dinner.

I think it turned out really cute!!

December 7, 2012

Embroidery

Got a new toy for X'mas... An embroidery machine!!

Few weeks ago I went to a Thirty-One party my friend was hosting.
It's like a Pampered Chef kinda thing, that a consultant would show off her product and the guests would place an order with her.
In Thirty-one's case, they sell bags.
At the party, of course I was thinking "I can make my own bags!" but since they personalize it by embroidery, I thought it was the cutest thing...
To help my friend and also because it was an one-stop X'mas shopping, I ordered sooooo much from her.
Then I thought, "you know, with the amount of money I just spent, I probably could've gotten my own machine."
So I checked Amazon and they had Brother PE-500 for $269.99 with free shipping.
(free shipping to Hawaii! That's a big deal.)
I asked my hubby if I can get it for X'mas, and of course he said "Just get it."
(That's what he says with whatever, but I feel like I still need to check with him)

I waited for few days, anticipating, checking the tracking everyday...
It arrived few days ago!!

Well, first of all, I advise you, if you ever get an embroidery machine...
ORDER SOME THREAD AT THE SAME TIME.
I've found some cute designs, and didn't realize how many colors it takes, so I ordered threads few days after I ordered the machine.
I had a couple of days in between the shipment, and oh boy the anticipation was killing me!
I was still playing with the machine with all purpose thread, and it just felt different.

Also...
GET SOME STABILIZER TOO!
Oh the stabilizer... There are so may types...
I wanted to embroider some tees, and cut away was recommended so I ordered some online.
I got a tear away while I wait, and I guess you can't really use tear away on knits because the needle will perforate the stabilizer and mess it up.

So far I love it!
I've personalized a pajama for my niece, made some tea wallets with "Drink Me!" design, and just embroidered Spiderman onto my son't tee.

November 26, 2012

Car Seat Organizer - Simplicity 2553


I'm making bunch of car seat organizers for X'mas gift.

I actually ordered Simplicity 2916, but didn't receive it right away, so ended up buying digital pattern of Simplicity 2553 online.
I did receive 2916 and cut into the fabric, but I've gotta tell you that 2553 is MUCH better.
Simplicity 2916 seem to make you cut alot of pieces for pockets etc, and 2553 seem to make you cut one big piece, and just fold it in pleats or stitch lines to make pockets so it's alot easier.

The hardest part about this pattern is definitely prepping.
Cutting the layers of fabric, interfacing, padding, then fusing the interfacings...
Sewing part was a breeze, finished everything in an hour or so.

Another thing is, it's REALLY thick toward the end.
I couldn't even use pins to hold the pieces together, so I used the clips I got from Japan. I love these things!


One thing to mention, is that it wasn't really a cheap project.
Buying two fabrics, interfacing, padding, 2pks of bias tape, webbing, parachute buckle... I think each organizer was about $15-17, using 20% off coupon from www.fabric.com.
I don't know if you think it's cheap or expensive, but to me it was pretty pricey, since I was hoping to make a $10 gift.
But I've never really seen any car organizer in character fabrics (I've seen alot of solid black, etc) so it does make a really nice unique gift, in my opinion.
(I just hope all the receipients enjoy homemade gifts!)

Overall I'm very happy with how this came out.
My kids saw one and of course they wanted one in their favorite character.
I think I will make them one, hoping they can keep the car a little more organized...


November 5, 2012

Refashion Contest


Wow, it's been almost 2 weeks since I wrote my post!
I was in Japan, and after we came back, I was battling a jetlag...
Then it got busy with Halloween... I've been going to bed at 8pm with the kids that I haven't really sewn anything.

Before all these, I joined the Refashon contest on PR website.
It's only for two weeks that I don't even know if I can make anything in time!

Challenge Contest 2012 - Refashion / Repurpose

It was a good timing, because around the time I entered I sorted out my closet for old clothes.
I divided them into something to donate pile (something I wouldn't wear anymore...too old, or don't like the color or print so I wouldn't wear it even if I upcycle it) and "potential" pile... Something that I don't wear, but like the material or print enough that I might still wear if I upcycle.

At first I was thinking of making something for my kids.
Then I found this top.


I bought it few years ago, and it had so much style back then...
The pleated neckline, dolman sleeves, long fitted hem to wear over the leggings (when leggings first came back to style).
But because it has so much styles to it, it looks so out of style now.
Also it's so fitted that I didn't feel comfortable wearing it.
I like the material (rayon/spandex) so I'll see if I can make something out of it.

At first I thought of making a top...
Cut the sleeves, make them into ruffles and attach it to the neckline.
But I don't like how neckline is so low.
I'll have to wear a cami even after upcycling it to sleeveless.

A skirt, maybe?
I wore it upside down, to make the hem band as waistline.
It was too tight overall.

So I raised it higher, and the hemband was perfect at my bustline.
Hmm.
Potential.
I'll go with this idea, just need to refine it... Only 10 days to go!!

11/5/2012
Ok, I'm done with one upcycle wardrobe!!

I really like the hem band of the turquoise top, so I kept it as is, and made a tee using Maria Denmark's free Kimono Tee pattern.
This has been one of my favorite pattern!!
It was long enough so I could cut off the pleated part and make a new tee.


I made a bias strip from cut neckline material.
I like the kimono sleeve as is, but it was Too short so I cut two bands from the original sleeves and attached them.
I like how it turned out... Dropped shoulder is in trend, and it's more wearable!

Here's another one.


I don't think this would qualify for the contest, but it's still an upcycle.
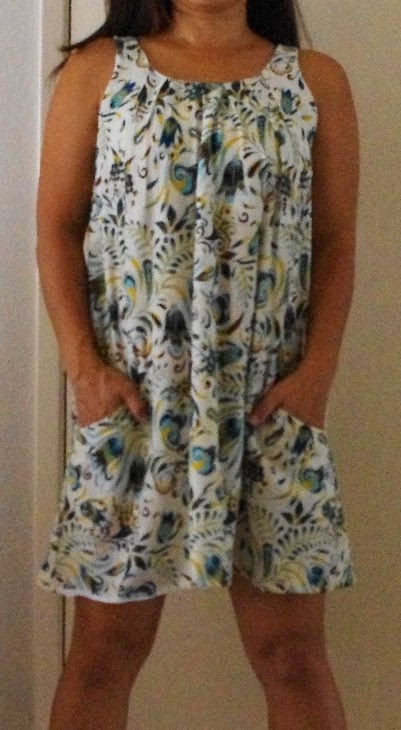
My friend gave me one of her maternity dress.
She thought I could do something with it...

I like it as is, but it is a maternity dress, so it has lots of material under the bust and it does make me look pregnant.
So I just cut down the bottom tier to make it a regular skirt.

Here's the combined wardrobe.


This should be good for the contest entry, but I'm on a role so I'll be going through some more upcycleable clothes...

11/6/2012

After I cut off the tier from maxi maternity dress, I was thinking of what I can do with the chiffon material.
It wasn't much, but it's such a cute print that I didn't want to just throw it away.
I wanted to make something like a tierred top, but I couldn't find any material that can go underneath the tier.

I had this long sleeve knit shirt...


I haven't worn it for a long time because
1. it's a long sleeve, it's too hot to wear in Hawaii.
2. I don't know like how low the neckline is.

When I layered the chiffon, it actually matched.
So I decided to make it a ribbon around the neckline, and made it a sleeveless.
It took care of the problems I had with this top!
I like how it turned out... It's more wearable!


I might do more upcycling, but for now I'm going to make a composite picture and post it up.

11/11/2012

I did another upcycling.
Here's the "before" photo.


I loved this top when I first got it.
I loved the color, the print...
But I never liked the low neckline.
It' so low, and because of the material it's droopy, that even if I wear something underneath, it has that droopy lazy look to it.
But I loved the print so much I couldn't get rid of it...
I took this opportunity to upcycle it to my daughter's top.


I cut off the neckline and reused it as a bias strip on the new neckline.
I added the butterfly sleeves but cheated and didn't finish the sleeve hems. :p

I added a little crocheted flower that I bought for 50cents in Japan.

My daughter likes it, and I think she'll get a good use out of it than just sitting in my closet.

I just loved this contest!!!
I love upcycling to begin with, and this contest gave me a motivation.
There're so many good materials hidden in a non-wearable garments, and upcycling brings it out!

October 17, 2012

Japanese Sewing Magazines

It's been awhile since I wrote a post... Why?
I'm in Japan!!
I'm visiting my family, it's been 3years since I came last.

Three years ago I wasn't this much into sewing, so I didn't go to the fabric store here in Japan.
I visited one few days ago and was a little disappointed...
I was looking for a nice soft cotton knit to make something for my daughter...
Then realized they were all the same prints as RTW, and RTW is so much cheaper, and the quality is pretty good.
Double gauze was something else I wanted to get, but the ones I wanted (Nani Iro) were out of my price range.
I didn't have much time as I went out while my mom watched my kids taking a nap.
I think I'm going back just to get a basic double gauze.
I just don't know what to make with it...

So I went pretty crazy shopping for pattern magazines.

1. Female Fall/2012
I think this was my favorite.
Although the patterns were basic, they were more of my style.
I liked it so much I ordered a back issue of Summer/2012.

2. Cucito Fall/2012
It's for children's clothes.
They had some matching patterns for kids & moms, which weren't all that great, but there were some other cute stuff.
I'd like to make some caps from this.

3. Mrs.Stylebook Fall/2012
I guess this one is pretty popular among sewing community.
I got it without looking inside too much...
I didn't realize it uses sloper and you have to draft your own pattern.
It seems interesting (and there are some nice garments) but sounds pretty hard.
I don't know if I'll ever make anything from this...

September 29, 2012

Patrones 305, #2 shorts

Patrones has alot of shorts.
It's amazing how much variation of shorts they can come up with.
I'm not a really shorts kinda person...
My stomach is sensitive so whenever my legs are bare I get a stomach cramp. :(
But even then, I wear shorts when it's really hot at home (I can't wear it at a store where they crank up the AC).
I really liked this shorts!!


It has so much details, and I like how it's more like a skirt.

I cut 40 waist and 38 rest.
It seems like true to size, since I didn't have to do any alteration.
I used a leftover denim that I made my jeans with.
This was a really light weight denim, and I didn't think it was fit for the jeans... But perfect for this shorts!!

Oh but the pattern looked REALLY short.
I didn't really read the instruction (cuz it's in Spanish), so I don't know if it suggested longer seam allowances for the hem, but I added 2in to the hem, and folded in about 1in after serging the edge.
This material didn't press well, so I only folded in once.


I really like how it turned out.
The picture looks so staged, but it's just on a white bed sheet. :p
It looks alot more dressy than the regular shorts.
(too bad I normally wear the top over and it'll cover most of the details...)
Now I can proudly wear this around the house and answer the door to unexpected visitors, rather then my other shorts that don't fit me.

Also I made this with about 1/2yd left over material (It wasn't enough so I used a scrap for pockets) so it was about $3 + $1.50 zipper.
Not bad, eh?
I think a pair of shorts with this much detail is much more expensive.
I might be having a big head, but I think this shorts at least looks expensive, thanks to a nice fabric from Fabricmart. :)

My husband said "Oh, are those skorts? Are you trying to bring the trend back?"
Hmm...
Am I trying to bring the trend back, or is my fashion too old in time??
Whatever the style I like seem to be few years old...
I need to research the current fashion more often...
But I don't like the current fashion, like print jeans.
I kinda like the color block but I'm too cheap to buy 2 different fabric for one garment. :p

I'm just so glad that I learned how to install a zipper and able to make bottoms.
I'm slowly replacing all the ill-fitted RTW bottoms in my closet. :)

September 25, 2012

Mini-wardrobe contest!


Mini Wardrobe

I just entered the Mini-wardrobe contest from Sewing Patternreview website.
I whipped up so many garments this month that I realized I could finish all the requirements.

Currently I'm working on a cargo pants from Patrones.
Now I just don't know which ones to enter to the contest.
I'm thinking about the Jalie jeans, cargo pants (if I can finish on time), two tops and a RTW cardigan.

Since I've been going crazy staying home because the kids are sick, this contest is letting me get my mind off.
I know other people are more creative and I probably won't win, but the contest itself is motivating and also fun.
I'm slowly trying to replace my wardrobe with more mature (no more Forever21!) wearbale garments, that this contest gives it a good kickoff.

Also, did I mention that my last hobby was digital scrapbooking?
So I'm also having fun getting the composite review together using Photoshop.
I want to make it look like a magazine page...
You know how some magazines shows each picture of garments, and then the posibility of combining them?

9/25/2012

OK, all done!!

I kinda wanted to play with the images more, but I merged all the images and accidentally saved it, so I really can't play with it anymore.
So here it is... Hope everyone enjoy!!

September 22, 2012

Patrones Issue 303 #23 Cargo Pants

So I'm working on a cargo pants from Patrones.
Hopefully I can finish it on time and this will be one of my entries on Mini-wardrobe contest.
This pants was pretty much the reason I got this issue.
I love how it's slim and sophisticated but a little punk in a cargo style.

First of all, yesterday I traced the pattern and basted a seam to check the fit.
According to the sizing chart, I'm 38 but so far all their stuff has been a little smaller on me, I traced 40 overall, and even 44 at the waist.
Since I'm 4'11" and knew it was gonna be long, I omitted the seam allowances on each vertical pieces.

After the fit, I realized I didn't have to use bigger size on waist afterall.
I had to take about an inch from the sides.
I also did my usual taking in about 2in from the center back to avoid gaping.
Alteration was that's about it, and it seems to fit ok except that it's a slim fit and I'm not used to it!!

The only thing is, I think this is pretty lowrise.
If I'm standing it's ok, but when I sit down I think the back waist will fall below my panty line. ( ̄◇ ̄;)
I guess it's ok since my tops are all long, but I don't know if it would be comfortable.

Today, I did the REAL stitches, and I've gone pretty far.
I attached the back pockets and side pockets.
I just love these side pockets!!
It has pleats! So cute!!

Then I realized I did some stuff wrong...
The front piece is made of 4 square (rectangle?) pieces.
They were sewn together, and I pressed the seams open...
But when I look at the magazine photo closely, they've been pressed downward and topstitched.
I guess it makes sense, that if you press the seams open there's a chance of splitting apart if a seam comes undone.
So I'll have to pluck those seams to fix this. And it goes underneath this pocket attached already. Agh! (>_<) This is what happens when the instruction is on foreign language and I have to rely on my little experience. Ok, this was my "Done for today, let's continue tomorrow" moment. 9/23/2012 My husband took the kids outside to play, so I got lots done... I'm almost done, just need to attach waistband and hem the bottom. Yup this is a low rise... When I bend down half of my butt shows. (without the waistband at this time) I doubled up the width of waist band by cutting a duplicate od waistbands, attaching it lengthwise. I hope this will make it a little higher... I guess this is the reason to do a muslin! I finished the pants...


At first I thought the fitting was off.
I was so concentrated on fixing the gap in the back, that I didn't realize there was more fabric in the front.
I was disappointed, but my husband said it's not that bad, and After awhile I felt ok with it.
If I look at it closely it's not really the extra fabric, but it's because of the material.
It seems to wrinkly easily so if I sit down, it causes wrinkles that makes it look like I have extra fabric in the area.

Here's the pix, copying the pose from the magazine...
Hmm, it doesn't really look the same... my legs seem to be about half the size. :p


Overall... It's ok, but not really my favorite.
I still love the pleated pockets so it's probably easier if I just use these pockets on Jalie jeans pattern.
I thought about taking it off the contest entry but I'll keep it. :)

September 20, 2012

Maria Denmark Kirsten Kimono Tee

Maria Denmark Kirsten Kimono Tee.
This was a free download pattern.
I just gotta say, it was amazing!!

I've used Digital patterns from several pattern companies, and this was the easiest to tile together.
On the corner of each sheet, where 4 sheets of paper meet, there's a circle and an X inside that you connect together.
The X gives more guidance and this seemed more accurate compared to matching a tiny square or small circle.

The instruction was very detailed, considering it's a simple tee with only two pieces of pattrns.
There was a photo instruction to make the neck binding strip from the same fabric.
There also was a detailed instruction of how to attach the binding strip to the neck.
I think this is the first pattern that I've seen with this much information on this.
It tells you what length to cut the binding according to the neckline length (85%) and divide it up in quarter section and attach it while you pull the strip.

The only thing is, I thought this quarter section method was a little off...
Since the front is a little longer than the back, if you divide the entire neckline equally in 1/4, there's less strip available for the front, causing it to pucker.
Next time, I'm going to cut the front and back neck binding separately...
85% of each length plus 4cm for seam allowance.

Ok, on my project...
I got this Houndstooth printed knit from FabricMart.
At first I wanted to make a dress but I thought a top will probably be more practical.
Then I saw this photo on Lucky magazine.
It's from Banana Republic ad.


Woooo, exactly the same color/print!!
I like it, but I know I won't wear long sleeves.

I was looking for a nice tee pattern, and found Maria Denmarks pattern.


I REALLY REALLY love this pattern!!
It's such a simple pattern, but it fits so good and I think it looks flattering.
I cut size XS and graded to S at the waist.

I'm normally so intimidated with knit and never happy with my neckline.
It always get wonky because it stretches out.
With this one, I applied a thin interfacing strip around the neck & sleeve edges.
And with the Maria Denmark's binding instruction, I think this is probably my best knit job ever!
I didn't add any interfacing to the hem, and noticed a big difference in difficulty.
I wish I added it to the hem as well.

I just entered a Mini-Wardrobe contest from Pattern Review.

Mini Wardrobe

Since we've postponed the Japan trip and I've been home with my sick kids for past few days, I've sewn so many garments already and it's enough for the contest.
I know I'll probably won't win because my stuff are so simple, but either way it's something fun to do. :)
I'm debating which garment to enter to the contest...
For sure this tee will be one. :)

September 18, 2012

Hot Patterns Medina Mini-kaftan

I'm on a role!
I thought I ordered so much from Fabricmart about a week ago, but I'm going through them pretty fast.

I used Hot Patterns Medina Mini-kaftan pattern.
Considering there're so many pieces, this was put together really quick.
From tiling the printed pattern, then tracing to finish, I got it done in one day.
I'm home all day because the kids are still sick... I did steps here and there all day.
Well I would even say half a day, because I didn't start til about lunch time.
The sewing did let the day pass faster for me... Staying home drives me nuts.

Anyways, I made it in white seersucker, with white linen trim.
The result needs a little modification...
First of all the sleeves spread out too much.
With this color, I think it really makes it looklike a hospital gown, or spa robe.
I thought about making it sleeveless (it reminds me of some Michael Kors dress) but I like the sleeves.
It probably looks ok to certain people, but since I have broad shoulders for my small frame, so it seems to emphasize it.
I pinched the sleeves a bit, and it makes it look more like a shirt.

I'm debating if I want to keep the drawstring.
It was a little shorter than it's suggested, so it comes closer to the sides.
With all the trim, it seems like too much details.
It's supposedly semi-fitted, but it's pretty fitted so it really doesn't need more tightening either.

I think the top (? Dress) is really meant as a coverup.
The neck is low and armholes a big, so you really cannot wear this on its own.


Done!
I fixed the sleeves.
I made the armhole smaller by shortening the sleeve facing and attached it as it would per instruction.
It might not show too much difference in the picture, but it seems so much better to me.


I also took out the drawstrings.
It's so much simpler but I think I'd wear it more this way.

I really love how this turned out!!!!
I don't mind making it in different colors.
The only thing, of course is this is white...
With Hawaii's hard water, it would be so hard to keep it white.
When I prewashed the fabric, it already gave a gray tinge to it.
I'll have to hand wash it under my filtered showerhead...

Funny realization...
While I was making this dress I kept thinking "Why does this look so familiar?"
Well, I own a dress like this already!!!


This was one of my favorite from Banana Republic.
It's been forgotten because although it's pretty tight, I still have to wear something underneath because the neck is too low.
I guess I always have the same style. :p
Maybe I was subconciously looking to replace this dress...

Btw I have two fabrics on sale.
For details Please check
http://lifeofadragonsmom.blogspot.com/2012/09/two-animal-print-fabrics-for-sale-15.html

September 17, 2012

Two animal print fabrics for sale - $15

I have two animal print fabrics I got as part of mystery bundle from Fabricmart.
I'm reeeeally not into animal prints.
I thought I would somehow use it, but just can't see myself wearing these.
So if anyone is interested, please send me an email.


One is black & gold ruffle knit, about 3/4yd x 28in.
The other is another knit, a litle heavy weight, maybe matte jersey?
It has brown print on blue background, about 2yd x 60in.

I'm not sure about the blue knit, but I know the ruffle print was going for $3.99/yd.
Assuming the blue one is about $3.99 as well, it's about $12 total originally, and I can sell both for $5.
The shipping will be $11.35 with medium sized priority USPS.
To make it easier, how about $15 for both including shipping?

I tried to sell on Ebay or Craigslist with no luck.
Hopefully someone will see this post.

September 16, 2012

Patrones 303, #17

I go this salmon pink (orange?) rayon challis from www.fabric.com.
I wanted to make simple top, and I'm starting to realize tops with sleeves are very easy to wear.
I like this #17 from Patrones 303.
It's a simple short sleeve top with center placket and pleats in the front.

This is the photo from the magazine.


This is the result...


Very boxy.
No wonder the model is tying (how do you spell tie-ing?) the front.
I guess it looks ok as is, but I don't like boxy top.
Since I had extra fabric, I made a belt to go with it.


Much better.

Does it look like a photo in the magazine?
I'm not sure if it does.
The pleats and the placket does, but my raglan sleeves came out more horizontal, that it's more like a shoulder yoke.
The style is ok, it's very comfortable to wear.
When I first finish it, the back was a little tight, but as I wore it for a day I think it stretched enough.

That's what happened to my last Patrones dress.
My measurement is 38, but if I scale size 40 to 38, upper top is too tight.
I think my shoulder to above bust is too thick?
This time I used straight 40, but even then it felt that way.

I've been out of my sewable tracing paper so I haven't been making a muslin.
Bold move, considering I've never used Patrones patterns, but so far it's not too bad.
I was waiting until I come back from my Japan trip to get more tracing paper.

Oh yea, the side talk...
My family was supposed to go to Japan to see my mom & family last week.
I thought I was so careful to keep everybody healthy, but few days before the trip, I got sick. :(
Then the day before the trip, my daughter startted coughing, and my husband started to complain that he feels groggy.
We were still planning to go...
Until the moning of the trip, my son just started throwing up like crazy.
He woke up saying his stomach hurts... then threw up in bed.
Afterward, he threw up every 20min... even a sip of water made him puke.
We rushed to the doctor with our suitcase in the trunk.
He even threw up in the car.
On the way to the doctor, we decided it's just too cruel to travel with him feeling this bad.

Luckily, we got this trip mostly using mileages, so the fee to change the dates were only about $50 per person.
It's still not cheap, but better than my son throwing up everywhere on the plane.
The trip alone would've made him uncomfortable.

After we got home, my daughter was getting worse as well.
She got a high fever at night, and we were glad we changed the travel plan.

So here we are, stuck at home, until we leave few days later...
Well at least I can make few more outfits before the trip!

9/17/2012
I have these two animal print fabrics for sale...
For more info please check the post
http://lifeofadragonsmom.blogspot.com/2012/09/two-animal-print-fabrics-for-sale-15.html


September 4, 2012

Jalie 2908

Now I know how to insert a zipper, and made a mock jeans, I'm trying Jalie 2908!!

I'm starting to notice how much of a difference a pattern can make...
When I tried making trousers in the past, I did so much alterations that I got an impression how much of a hassle to make pants, and didn't really want to make any more.
Now I tried Jalie and hardly had to make any alteration, it's so much fun (and cool! Making your own jeans? Yeah!).

With Jalie 2908, my size is U at the waist and R at the hip.
I traced the pattern accordingly, and cut the fabric.
I traced the pattern on the fabric first, and added extra 1/2in to the seam allowance (3/8 SA already included, so mine has almost an inch) in case my sizing was incorrect.
It's a stretch fabric so I couldn't use the tracing paper as my muslin.

I first basted it at directed 3/8 SA, and it fit perfect!!
Only alterations I had to do were the usual...
First I pinched about an inch at center back to avoid the gaping.
Second... This pattern is for bootleg, so there's a little tapering in & out at the knee.
Since I'm short, this tapering came below the knee, so I brought it up about an inch or so.
As expected the length is about 5inches longer than my height. I wish I shortened it at the knee.

Now I'm going to start the pocket details... The fun part!
I got this DKNY design off the internet that uses 3 different colors... I think it'll be pretty. :)

9/9/2012
It's 2:30am, and I just finished the jeans!


Back view...


No, I didn't stay up til 2:30 to finish it...
I passed out with the kids at 8pm. My daughter woke me up at 1am for water, and I couldn't get back to sleep.
I was almost done with the jeans, all I needed to do was pu the belt loops on.
I kept thinking about it so I decided to just get up and finish it.
Now all I need to do is to hem. I'm gonna put it in the washer few times to shrink it first.

Just as others, I LOVE this pattern!!
It wasn't hard at all to make it.
Well, it's probably not recommended for a beginner, but if you've sewn pants you'd be surprised that jeans is not much harder.
But because the fitting was great, I didn't have to spend hours trying to figure out the alteration. (Was it just me?)
It just takes longer because of all the topstitching.
And you might wonder if your machine can handle jean sewing?
I think as long as you use the right needle you're fine.
I used size 16 because my denim was pretty light weight, but once I got to the waistband it started to have hard time pushing the needle through all the layers, so I switched to 18 and it was fine.

Awwww, the topstitching....
I got three colors of topstitching thread because I wanted to make the DKNY pocket design, and I'm glad I did.
One roll of the basic brown thread just isn't enough to do all the topstitching job.
I almost ran (well, drive) to Walmart to det another, but decided to use other colors for the belt loops and waistband.

Oh, another alteration...
I added an elastic to the back waistband using Sandra Betzina method.
I get bloated easily so this will accomodate the changing belly size.

The only complaint with the Jalie pattern is that it's HUGE!!!!
It's slightly bigger than 8x11, so I really don't know how to store it.
It doesn't fit in the sheet protector, nor the filing cabinet.
It doesn't fit in the manila envelope.
I gave up and just put it on the bookshelf (where I keep sewing books) as is, thinking I'll come up with something later...
How do other people organize it??

9/17/2012
I have these two animal print fabrics for sale...
For more info please check the post
http://lifeofadragonsmom.blogspot.com/2012/09/two-animal-print-fabrics-for-sale-15.html

9/20/2012

I just enetered the Mini-wardrobe contest!
Since I've been home and sewing alot, I noticed I've sewing so many garments this month.
I just don't know which pieces to enter the contest.

Mini Wardrobe

August 27, 2012

Sea Life Park

It's been such a nice weather recently, but my daughter is still getting over her cold, so instead of going to the beach we decided to visit Sea Life Park yesterday.

Sea Life Park is like SeaWorld of Oahu.... supposedly, but in much much smaller scale.
We got in for $12/pp using Foodland member's card, but it's normally $40-$50 for an adult admission.
It's sooooo not worth $50. Hawaii is just expensive overall.
It has about 2 dolphin shows and sea utter show, and that's about it.
There're attractions like swimming with dolphin or in a shark tank, but it would cost $100-200 separately.
It has shark tanks and turtle feeding tanks... that's about it.

But it was fun enough for our 3yr-old and 1yr-old.
My 3yr-old son keeps talking about how high the dolphins jumped, or how big the sharks were.
The kids had fun, and that's what it all matters.

The thing that ruined my day happened at the end of the visit.
There was a playground, so our kids were playing...
It was one of those playground with small ladder to go upstairs, and it was too small for the adults to follow.
So I was watching my son go up, and all of the sudden this other kid (maybe a little smaller than my son) ran up to him and took my son's glasses off!!!
We just didn't see it coming.
I yelled out "HEY!! Give him back his glasses!" and the kid gave it back to my son right away.

Then he went off and took a hat from this older Japanese tourist boy...
He and his big sister ran up to their dad and told him that this little boy took his hat.
The dad didn't really see it happening, so he told the kids to go ask the little boy to give it back.
What did the little boy do? He threw it over the bush, outside the playground.

I'm not mad at the boy... I know he was just a little kid and they do those things sometimes. (Although my husband thinks he's old enough to know that what he's doing is wrong...)
What irritated me was that the little boy's DAD was just right there, watching the whole thing and not saying anything about it!!!! :(
I'm glad the boy didn't break my son's glasses, or else I would've gone up to the Dad to talk to him.
(Funny thing how you get stronger when you have a child... I never thought I'd be yelling at another kid, or tough enough to go complain to another parent)

I know I'm a little sensitive over my son's glasses...
I really hope these things don't happen when he starts to go to school, but I'm sure he'll bump into these situation here and there.
I'm asking my husband teach him some self diffense in case...
I feel bad for my son, because even at a playground the glasses can get in his way (glasses fall off by accident, and he has to stop his play to pick it up and put it back on, or his glasses get caught on a toy, etc)
I hope my son can start using contacts soon!!!

August 24, 2012

Patrones #306, Dress #23 again

I loved how my last Patrones dress turned out, I decided to make it again.

Here's the original dress.


I had this fuscia cotton-poly knit I got from www.fabric.com.
I normally lay out all the pieces on the fabric first to make sure that the fabric is enough, but for soooooooome strange reason, I was so cocky that this fabric was enough, that I just started cutting the pieces.

Sure enough, it wasn't enough.
I had to squeeze out all the outer pieces (one piece crossgrain, but I'm sure no one would know...), but didn't have enough to make a facing.
I couldn't find any knit fabric reminent in my stash either... (I mean, I don't buy fuscia color that often!)
So I'm gonna try the elastic binding method.

I have a hardest time binding the knit neck/armholes...
It always comes out wonky.
I searched through PR website and noticed that some people use elastic to keep the neckline shape intact.
Hmmm... worth a shot.
I;m planning to wear this in casual occasion only (around the house, to the park, etc) so this might be a good project to practice this method.
Hopefully it works out, and I can conquer the knit binding and no longer be intimidated by knits.


8/25/2012

I finished the dress.
Well, actually not completely. I still haven't hem but since it's not fraying I'm already wearing it. :p
It's such a comfortable dress, but I realized that the color can make it fancy as well once I added the black belt.

I wore it to Target, and we decided to have a sponteneous beach dinner picnic.
The outfi was so not ready for beach, but oh well it was fun for the kids.
Believe it or not it was pretty chilly by the beach on August in Hawaii.
Here's a beach shot at sunset time.


Anyways for the sewing talk...
I finished the neck and armholes with elastic.
I zigzaged the elastic to the wrong side edge and turned over then topstitched.
I did the neck first, guess-timating the length of the elastic...
I think I pulled the elastic too much and ended up gathering the neckline a little.
Learning from the mistake, I pulled more gently on the armholes and I think the result is better.
Although I still need more practice, I like the finish of this method.
It doesn't look stretched out like the way my knits normally turn out.

Once again I like this dress. It's really comfortable, but like this pink one, I can make it casual or a little more dressy.

The only regret... however not about the dress.
I had my husband take a picture of myself with the kids wearing this dress.
I cropped it to upload it to the blog, and ended up saving it that way and lost the original photo. :(
My son was making a funny face and it was a funny picture.

August 20, 2012

Simplicity 1872 and Oliver & S

I got this fabric for free from PR member, but it's polyester and just too hot for Hawaii.
There was almost 4yrds of it, so I decided to make a dress for my sister-in-law who lives in California.
I've made her a Simplicity 1872 in the past so I already had a pattern.
Unfortunately I cut my fabric wrong so I couldn't make a dress but made her a top instead.


It wasn't enough for a dress but I had enough left over material so I made a ruffled top for her daughter.
I'm a little iffy on this top...
I think the back is too low and exposed.
I've made one for my daughter in the past, and her back is always wet because she sweats and there's nothing to absorb her sweat.
I might modify it so it has a back and has shoulder straps instead of a halter.
I just like their ruffles.
I think it turned out really cute with red trim.


We got some goodies from Hawaii and will be shipping this out tomorrow.
I heard CA is pretty hot as well... Hopefully they'll be able to wear it.

August 15, 2012

Simplicity 1872 Cynthia Rowley Tops

I had this rayon challis fabric washed and ready to go for awhile because I couldn't figure out what do with it.
It's a cute floral when you look at it, but from far away it seems a little grandma-ish...
Maybe because my grandma used to wear clothes like this all the time.
I thought I had to use a pattern that's more young with cutesy details.
Maybe peasant style blouse?

But I decided to use Simplicity 1872.
It was sitting in my closet for awhile now.
I've made it for my sister-in-law before but with wrong fabric... Thick satin.
With three layers of tier, it was too bulky.
So I've been Waiting for some thin material, and rayon challis is probably good.
But I only had 1 1/2 yd so I decided to go with the top.
I'm debating if I want to add sleeves... (if the left over fabric is enough)
I didn't like the short sleeves with a tie, but the other puff sleeves option looks too poofy.

I cut the fabric today and started sewing...
This is such an easy breezy top.
I was going along so smoothly.
I sewed the shoulders, sides, front neck facing...
I attached the peplum, and just need to finish the armholes, hem and make a belt.

Then I realized I'm almost out of thread.
Aaaagh, I hate it when it happens...
Do I need to have a backup of all the colors??
I have enough pattern and fabric stash.
I really don't want to start a thread stash...

But so far I'm really loving this top!!
This is a new style for me.
I'm so used to something flowy and loose that I'm not used to this fitted style, but the peplum makes it flowy enough with this challis fabric.
I think this pattern worked great with the floral pattern too.
It's no longer grandma-ish!

It goes well with my newly made fitted stretch jeans!!
I can't wait to finish it.

Upcycle - My Guess tank to my daughter's tank

I just did a quick (sort of) upcycle yesterday.

I had these two tops from Guess that I had for the longest time.
I hardly wore them so they were still in good shape.
But for some reason I kept it thinking I'll still use them.

Well, I bought them when I was in my 20s.
Now I'm not comfortable wearing spaghetti strap tight fitting tanks anymore.
(I don't even think they fit me!)

So using her comfortable Old Navy tank as a template, I cut them into my daughter's tanks.
It's funny that I left the side seams as is... It didn't make too much size difference!!!
I guess it's a rib knit, and it stretches to the max with adult wearing it, but with a baby it'll keep it's ribbed shape.

This is the picture after I cut the green one.


It was sort of a disaster...
It doesn't frey, so I just folded the neck and topstitched it...
And it came out all wonky.
So I gathered the middle just to keep the length to the original.
After this I thought it's probably better to use a binding for sleeves, so I did...
And it was even more wonky!!! It got probably 2inches bigger than when it was cut.
Ugh.
I ended up cutting off the sleeve binding and left the edges as is.

Not shown in the picture, but that's what I did with the red one...
I just cut the neck and sleeves and left the edges as is, and it looks alot better.
The hem has a cute ruffling and I kept the Guess embroidery.

Remind me never to sew rib knits again!!!

August 14, 2012

Patrones #306, Dress #23


I just made a dress #23 from Patrones #306.
it was nice that from tracing the pattern to finishing the hem, I got it done in one day.
It's been awhile since I finished something so fast...

Here's the original dress.
The detail shows alot better in solid.
I also love the color of this dress.
It's more orange in this picture, but it's more like a salmon pink, or red grapefruit.
I just ordered a solid rayon challis in this color. I was going to make another Rachel Comey top with it, but maybe I'll make this dress?


Patrones is in Spanish.
It was a simple dress, but I had to use the translater here and there to make sure I was doing it right.
In case anyone wants to make it, here's the rough instruction. (Well, the way I made it, not an exact translation.)

1. Press the front pleats as directed on the pattern. Baste.
2. Attach the pockets. Sew the pocket pieces to middle front (1) right sides together. Turn the pockets over and press.
3. Sew front middle piece (1) and side front (2) together. The bottom of side front (2) is sewn to the pocket pieces right sides facing each other.

Since I made it in jersey, I cut the inside front piece (3) and back piece (4) below the bust to make them a facing instead of a layer. I'll call them 3 and 4a.
I follow the instruction of Vogue 1236 for similar dress construction.
I wonder if it would be the same if it was a layer?

4. Sew front (1,2) and back side seams.
5. Sew inside front (3) and back facing (4a) side seams.
6. With right sides together, sew front and back (1,2) piece to facing (3,4a) at the neck, back and armhole, leaving about 1in oprn at the top of shoulders.
7. Turn the facing over, press. I actually topstitched the neck and back very close to the edge. Since I used a different fabric for facing, I didn't want it to show.
8. Open out facing at shoulders. Sew front and back together.
9. Turn facing down, turning remainder of armhole edges along seamlines. Press. Understitch, or in my case I topstitched the edge.
10. Hem.

Once again I made this with 1/2yd jersey fabric from www.GirlCharlee.com.
I didn't have enough for the facings, so I use some knit scrap to make the facing.
But I think because this knit didn't stretch as much as the jersey, the bust area came out a little snug.
I graded the pattern doen to 38 according to my measurement (I'm actually 40 at the waist, but because it's a loose dress 38 overall was fine).
If I was to make this in woven, maybe I'll make size 40 at least around the top.

Overall I love this dress. Very casual and easy to wear, but has a little detail of the front pockets.
I might make it in solid woven next time so the pocket detail shows.

August 13, 2012

Patrones


Got my first Patrones.
I've been subscribing to Burda for awhile now, but I noticed that their style is becoming more of fitted, sheath dresses.
I like flowy, airy style, and thought Patrones is more of my style.
I looked few previews and instead of getting the current issue I got issue #306.
I pretty much want to make everything on this issue!

The good thing about Patrones is that there're less pattern per page for tracing, so it's easier.
The bad is, they only include 3 sizes per pattern, and they're usually 40-48.
I'm probably 38, so I'll need to grade it down each time.
And of course, the instruction is in Spanish!
Well at least I knew about this before I got it.
I think I can sew without too much instruction so it should be ok...

Off to tracing a pattern!!

August 12, 2012

Burda 7/2010 Trouser #103 Mock Jeans

This is the second #103 trouser that I made.
I got this really light weight denim material from FabricMart, and was unsure I should still use it as jeans, but after going to the mall and saw so many jegging style, I decided to go ahead.


Side view...
Sorry the picture is a little blurry, I'm not sure if you can still see the topstitching details. It's so hard to use self-timer and get a good focus!!


First of all I'd like to thank Sandra Betzina...
I don't think I could've made this pants without all her techniques.
I was always intimidated by trousers because of zipper installation, and also because of the waist fit.
My waistline changes drastically throughout the day, and I can't fit pretty much all my pants (except for drawstrings) by the end of the day.
After learning her zipper installation and elastic waistband technique, I'm no longer afraid of making pants!!
In fact, now all I want to do is make pants, because I finally learned the joy of wearing fitted pants!!!

I made my first pair in navy stretch gabardine.
It was more like my muslin for this one, and I had the hardest time matching the side seams... the back piece was so much longer than the front.
This time it matched perfectly, so I guess I must've traced it wrong, or added wrong seam allowances.

I love this jeans top stitching thread.
Just by using this it looks like jeans. Haha

I think the direction calls for topstitching where the back piece meets the side piece, but my DH said "Umm... doesn't that supposed to go to your side?"
so I ended up topstitching every seam, and I think it looks better.

Oh, sorry, I'm actually not done with this...
I still need to add belt loops, hook/eye and hem.
I was gonna wash it a couple of times before I hem.
My marrakesh trouser shramk about 2inches after I hemmed, so I learned my lesson.
I just wanted to review it while my kids are outside playing with their papa.

Conclusion,
I really love the pants!!
I don't know if I love the extra side piece in the back, but I love the fact I have a fitted pants that fits.

Now I'm off to making a *real* jeans using Jalie pattern...


August 7, 2012

Simple Modern Sewing

I'm making a flutter sleeve top from Simple Modern Sewing book.
This is an English remake of Japanese sewing book... Which is kinda funny because I can read Japanese, but I'm using the English version.

Anyways I loved this top when I first saw it.
It's made in lawn, but when I got this vintage-print jersey from Girl Charlee, I wanted to make something flowy with sleeves and I thought this top was perfect...

Well, only in my head.

I HATE the sleeves.

It looks good when my arms are down, but once I lift them, it just opens up and shows my entire arms... And when I bring the arms down, the sleeves don't come back the way it was to cover my arms.
It sorta looks like sleeveless with a little fabric by my side.
It's like, what's the point of these sleeves???
I was checking in the bathroom mirror forever (my husband asked me "are you doing ok in there?") to figure out what I could do with it.

Oh yea, there's no way of do-over... I only had 1/2yd of this fabric and I cannot cut new sleeves.

I was trying to sew the edges of the hem together to close it. Not a bad idea.
Maybe add a cuff and make it puff sleeves with slit? (I actually have something like that, and I love it)
But because I like how the sleeves flare out, I think I'm going to sew the middle of the slit togetjer, and add a small bow on it.
I think it'll turn out cute... Hopefully not just in my head. :(

8/10/2012
Here's the shirt, without the sleeve modification.


From the side, arm down.


Now it's done, I don't know if I'm gonng change the sleeves.
Just because I'm LAZY.
It looks ok as is, and it took me few days to complete this simple top (because I kept passing out at 8pm with my kids, and couldn't get to it), I feel like I don't want to deal with it anymore.

There're few things that could be improved...
Sleeves are one, and the other is the neck binding.
Once it's done, it was so wonky!
I have the hardest time sewing thin cotton jerseys...
I was looking for some tipe on sewing pattern review site and found this.

Seems very promising...
I thought about taking apart the neck binding for this top and do it over, but decided not... once again, LAZY.
Next project...

My husband asked me "How long will you be sewing? Aren't you bored yet?"
I've gone through so many hobbies, and I think I've been sewing the longest. (5-6 years now)
It's because there's so much to learn!!!
Not only there're different types of garments, but there're fitting issues, techniques, etc...
Just like the neck binding.
I thought when you sew with woven, you're not supposed to stretch the binding or else you get puckering effect.
But I guess when it comes to knits, you have to stretch it, because if you don't, it'll stretch on its own in a funny way.
Who knew? (OK, the sewing experts would)
Just like that, it makes a huge difference by knowing this small fact.

July 30, 2012

Burda 07/2010 Trouser #103

With any pattern, I always avoided pants because I was so intimidated by instaling the zipper.
But thanks to Sandra Betzina's zipper installation tutorial, I'm no longer afraid!!!
With my Marrakesh pants, I successfully installed the fly front zipper... twice!
So now I have this ambition to make me a fitted pants.

I always wear loose pants like linen drawstring pants.
My recent friends probably have never seen me in fitted pants, or jeans.
It's not because I don't like them.  I love the look of it.
I just don't own a pair that fits me!!!
I used to wear them more often when I was younger, when fashion was more important than the fit.
So I do have alot of these pants in my closet, but when I went through them, there were maybe two that fits me decent.
Because my waist is proportionally bigger than my hip, it's just so hard to find a RTW pants that fit.
If I go with my waist, it's just too baggy, and if I go with my hip, I can't close the zipper.
It's even hard to find something that fits around my thighs.

So I decided to make Burda 7/2010 Trouser #103.
I like the jeans style of this pattern.
When I first saw it , I was drooling and thought it would be great if I can make this, but no... it's got a zipper. I cannot.
And ha!  Now I can!

Since it's made with stretch fabric (I chose stretch gabardine), I can't really use my sewable tracing paper for muslin.
So I traced my size (36 at hip, 38 at waist) and gave a generous seam allowance, which is 5/8".
I wanted to make 1in, but I didn't have enough fabric.
I basted the pieces at seam allowance, and it was a little too tight.
So I tried it with extra 1/4in SA all over, and it was perfect!!!
So I think it actually ended up fitting just right without any alteration to the pattern.

Now I'm off to installing a zipper.

I just wish this pattern had back pockets.
It looks so much like jeans, but it doesn't have pockets.
But oh well, I didn't have enough fabric anyways.
With my next fabric (stretch denim), I have enough fabric so I'll try to add pockets.

8/3/2012
Phew, what a couple of days!!
I easily installed the zipper... That wasn't the problem.
The problem was the side seams!!
The back pieces were alot longer than the front piece, so I had the hardest time easing it together.
I tried it maybe three times, and thought that was my best, so I serged them to finish...

Then I *thought* I realized that front and back waistbands were different width, so I ripped the side seams apart, serged seam and all...
Then I realized that the waistbands were the same width.
I was looking at the waistband fabric that I cut wrong. :(
So back to square one...
I had to ease the side seams.
Which was actually not that bad compared to ripping the serged seams!

Then I moved onto attaching the waistband.
My waist size varies so much during the day...
I get bloated easily, so the pants that I wore in the morning cannot fit me, by maybe 2 inches.
I used Sandra Betzina's elastic waistband method.
I cut the waistbands at my biggest waist measurement, and cut the elastic at my smallest waist measurement.
After attaching one side of the waistband to the pants, I zigzagged the elastic to the seam allowance of the waistband.
Then I folded the waistband over to finish.

This is brilliant!!!
I tried it on, and since it's night time, my waist is at the biggest size, and it was still snuggy comfortable.
And I'm sure it'll be as comfortable in the morning because the elastic will put it back in place.
I think I could've added a little more to the elastic...
Even though it's no longer tight, but it's still more comfortable if I unzip a little. Haha

I'm almost done with this pants. All I need to do is hem the bottom.
I almost pushed myself to do it tonight, but I stopped myself to give me some rest.
Thank goodness this is almost over!!

I'm not complaining about the pattern...
It just feels like I've been working on this pants forever.
I really like it, and I'm thinking about making it in stretch denim after this.
The only thing is, as mentioned in the reviews, that this is pretty high waisted... Maybe 1in above naval.
I don't really mind it as I normally wear my tops over the pants.

July 29, 2012

Alison Bathing Suit


I live in Hawaii.
We go to the beach, the pool, and I swim at the gym 2-3 times a week.
Needless to say, I go through my swimsuit fast.
I normally get them on sale, but it still costs about $30.
So I figured it's about time I learn how to make a bathing suit.

I downloaded Alison swimsuit pattern from BurdaStyle website.
It came in 3 sizes- 32-34, 36-38, 40-42.
I fit right about 36-38.

It was easier than I expected.
They called for zig-zag or stretch stitch.
I tried zig-zag but when I tried it on, the stitches stretched and you can see the seams.
So I checked the machine's manual and discovered stretch stitch.
They recommend it for something that needs stretching and durability.
It's pretty cool, except it's a pain to undo if you make a mistake!

The instruction, although Kitty Couture made it really good, it was still a little vague...
Well, I guess not the instruction, but the pattern.
There's no notches to attach things, so you just need to try it on and pin where you want things to be.
That's what I did with attaching the binding to bust insert, and I think it came out a little higher than expected.  It turned out ok, as I like neckline higher anyways.

One thing to note, is when you add the center tab, make sure you add it on before you attach the lining to the bodice. 
The instruction to attach the tab comes much later, so I attached the lining to bodice first, and found out later that you need it to attach it before, so it'll be enclosed to the seam.
I didn't want to undo the stretch stitches, so I added on from the outside, and although it doesn't show outside, it wasn't easy to do.

Also there isn't really a pattern for single back strap.
I used the pattern given- which is meant to be a tie so you cut 2- I only used one- and it was too tight that I couldn't get to put the suit on, so I took it off.
I was too lazy to make measure and make another one.

I used the Kitty Couture's leg binding instruction, but for the width I cut the binging in half - which was too narrow, I think.
Next time I'll use something a little narrower than the binding, like suggested.

I made one alteration - I copied the front & back bodice and cut it around the crotch area and baste them to front and back bodice.
This, in my head would've made it a skirt, like my current bathing suit, but it just ended up making a tankini over this bathing suit.  :p
I had to widen the sides if I wanted it to be a skirt.

So I bought a yard & half of swimsuit material for this at $10/yd.
I think I can make one with 3/4yd, which makes this suit $7.
Alot cheaper than RTW!!!

>>>>>>>>>>>>>>

7/28/2012

Yesterday I went to the gym to test out my new swimsuit.
Luckily I took a shower in the locker room first.
The suit bottom was almost see through when wet!!
It's because the background of the fabric is almost white.
I think I could even see my c-section scar.
I was glad I had the "tankini" over it, since it's not really see through once there's another layer.
But because it's a tankini, it would rise up in the water I had to constantly pull down on it.
I'll probably have to wear a board shorts with it just so I don't get too self concious.

The fit was great, though.
I thout it was a little tight when I tried it on, but it felt great under water.


Since I had some extra fabric I actually made another one.
This time I made it a tankini top, and cut the bottom below the waist to make a panty bottom.
I took apart my old bathing suit and used the lining to line the bottom.
I guess at least the bottom should be lined, huh?

Uploading the picture tomorrow.


July 24, 2012

Marrakesh Pants #2


I was happy with my white Marrakesh pants, so I wanted to make another one.
I had this pink linen/rayon blends I got from www.fabricmart.com.
Well, I think it's linen/rayon.  It was part of the mystery bundle, and it looked exactly like my white linen/rayon blends.

This time I added the buttons to roll up the hem.
But because the hem is kinda heavy, it doesn't really stay up...
It wants fold down in the weird way.
If you really want to keep it this way, you might want to stitch a little on the side.
I ended up wearing it without the roll up, because I forgot to shave my legs.  :p

The only thing about this pink pants is, I really don't know how to wear it!!
It just looks like pajamas if you don't somehow dress it up.
Today I matched it with a black top & black sandals, but that's all I can think of...
I definitely cannot wear it with a tshirt and sandals, unless I'm going for a "I just woke up, and this is what I slept in" look.


July 20, 2012

Burda 3/2010 #118 top


Oh this was a satisfying project.
It was so easy that it only took me about 2hrs to make this.
The best part?
I made this from 1/2yd of fabric!!!

One thing that made it easier is because I've already made this before.
So I already had the pattern traced and I knew it would fit me.
Last time I made it, I used a thicker jersey, and it wasn't drapey enough to work the cowl neck.
So everything was a little poofy...
That was actually a nice organic cotton jersey too.  What a waste of a nice fabric...
I still wear it, to the park or something, but I think I'll take it apart and make something else...

Anyways.
This fabric was from www.GirlCharlee.com 1/2yd fabric bundle.
When I saw this fabric and felt the drape of it, I thought it would be a perfect fabric for this pattern.
I just didn't know if it was enough...  I mean, 1/2yd.
So I cut it on crosswise grain.
I really don't know if this is the right thing to do...
Every pattern tells you to cut it on the grain.
But I remember some patterns actually tells you both the grain & crosswise grain, so I thought it was ok.
So I did, and I barely got the top out of it.
The pattern calls for a waistband & drawstring, but I didn't have enough for that detail.
It probably would've been cute!

It's such an easy top...
Since it's a knit, it doesn't fray so I didn't even use the serger which made it easier.
The only thing is, the cowl neck is way too low for my taste.
It's such a nice light fabric, that I really want to wear it on its own, but I have to wear a cami underneath.
I'm really starting to hate to wearing a cami to all my clothes because of low necks.
It's July, and it's HOT!!
I'm thinking about sewing a bandeau instead.

I pretty much wrote everything on the pattern review, so I'll just paste it.

I just gotta say, I'm VERY glad that I got to make a top with sleeves with 1/2yd fabric.
I've been wanting to make more tops with sleeves.
And I still got a whole bunch of 1/2yd fabrics from GirlCharlee bundle!  :)

Pattern Description: Knit top with cowl neck created by gathers by the shoulders.
Pattern Sizing: I traced between 36-38
Did it look like the photo/drawing on the pattern envelope once you were done sewing with it? Yes except for my modifications
Were the instructions easy to follow? I didn't really follow the instructions.  It's a pretty easy top.  Gather the slit by the shoulders, stitch shoulder & side seams, finish the hem, that's it! (the self neck facing is folded in)
What did you particularly like or dislike about the pattern?  I love how easy this pattern is, but it's a little more stylish than just a t-shirt.  I don' like how the cowl neck is too low.  Is there a way to raise a cowl neck?  It would be nice to not have to wear a cami underneath. 
Fabric Used:  Cotton Jersey from www.GirlCharlee.com.  Believe it or not, I made this with 1/2yd cut!!!  I cut the patterns on crosswise grain.  This was one time I was happy that I'm short.  (4'11'')  It was barely enough to make the top, so I couldn't add the waistband as the magazine.
Pattern alterations or any design changes you made:  As I mentioned, I didn't add the waistband/drawstring because I didn't have enough fabric. 
I also didn't gather the sleeve hems, because I think my arms are big for my frame, and gathered sleeve hem will make emphasize it.

Would you sew it again? Would you recommend it to others?  I really do recommend this top!  It's such an easy top...
Since it's in knit and it doesn't fray, I didn't even serge the edges, which made it even easier.  I probably made this in less than 2 hours.

Few things to mention.
I've made this top in the past, but with a thicker jersey.
It didn't drape well, so it came out a little puffy.  Drapey fabric is the key to this top.
Also, when you gather the shoulders, I think it would look better if you concentrate the gathers toward the neck. 
I didn't really pay much attention, so mine gathered toward the sleeves, and it flared the bottom hem outward.
I think if you gather it toward the neck, it'll fall down nicely.
(Do I make sense?)
Conclusion: This is a really easy top to make with nice style.  Highly recommended to even beginners, and it'll create a top that's more than just a t-shirt!