One more post today...
One of the fabric from today's shipment was cotton lawn from Liberty of London.
Yes! I finally got my hands on it
It was on sale (i think $26/yd or something?), plus I used 15%off coupon so it was about $22/yd...
I only got a yard of it.
Ok, it's still expensive, but it was my Valentine's gift. ... That my husband doesn't know about. Haha
Anyways...
I finally got to feel the infamous Liberty Lawn, and my thought was...
"what? This is it?"
I'm sorry for all the Liberty fans, but I didn't think it was "that" great.
Don't get me wrong, I still think it's a nice fabric.
I just didn't think it should cost $35 for their regular price!
It mus be the brand thing.
Well, nonethless I like their prints anyways.
With all my blabbing, I'll probably still buy some if I ever get another chance. :p
2/28/2012
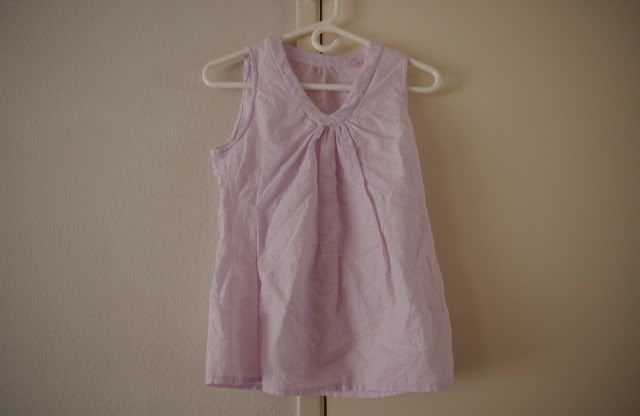
I want to make a top with this Liberty fabric, mostly because I only have 1 yd. :p
I want to make a blose with bow tie at the neck, so I searched the net and found this.
http://www.sears.com/shc/s/p_10153_12605_007E1158000P?prdNo=6&sid=IAx20080731x000006&aff=Y
I love this... Floaty, with comfortable 3/4 slightly puffed sleeves.
Funny thing is, it was sold for about $23 in Sears. It's probably cheaper than buying a yd of Liberty fabric! Haha
February 25, 2012
Vogue 1236
I just got a new shipment from www.fabric.com, and one of them was flower (twig?) print from linen/rayon blend, and it looks perfect for Vogue 1236.
So now I'm sewing up the sewable tracing paper muslin for it.
I just made size 12, according to Vogue sizing and it was too big, so I made size 10 and it was better.
It seems to be happening more, actually with all the Vogue patterns I've tried.
Maybe I'm actually size 10 in Vogue.

Here's the review...
Pattern Description: Loose fitting dress
Pattern Sizing:8-24. I made 10.
I at first used sewable tracing paper to make a rough muslin in size 12 according to Vogue size chart, But it was too big. After making few Vogue patterns in 12 and always have to scale it down to 10, I'm starting to think I'm size 10 in Vogue.
Did it look like the photo/drawing on the pattern envelope once you were done sewing with it? Yes
Were the instructions easy to follow? Yes
What did you particularly like or dislike about the pattern? It is very comfortable! I like that it's a pullover dress without any zipper. No dislikes.
Fabric Used: linen/rayon blend from wwwfabric.com
Pattern alterations or any design changes you made: i raised the neckline by 3cm. I made the facing accordingly, but probably because of how I made it, it didn't match the length of the bodice neckline so I had to make another pleat... Which isn't too noticeable.
It probably defeats the purpose, but after sewing the shoulder seams together I just topstitched around the armholes instead of slipstitching. I didn't trust my hand sewing. Lol.
I didn't add lingerie straps. I thought about adding the belt loops but the belt sits well without it.
Because of fabric limitation (i only used 1 1/2 yd!) i only made one pocket. Nobody will know, plus I never use two pockets anyways!
I didn't modify, but the armholes are a little too big for me. You barely can't see the bra, but it's just my preference. I'll probably modify it next time.
Would you sew it again? Would you recommend it to others? I would probably sew it again. It looks like it's something my mom would like, so I can picture her asking me to make her one once she sees it.
Conclusion: it's an easy pattern to sew, that produces very comfortable, stylish dress. I love how I can say "I'm wearing a DKNY dress!".
Multiple project
I went to the gym yesterday and worked out for about 11/2hr yesterday.
I changed my work out every 10 min, and finished off with taking 20min of Zumba class.
It was a nice work out, and realized that I get bored easily.
I used to take Zumba for 1hr, and although it's really fun, I get bored half way in, and keep looking at the clock to see when it'll be done.
I had a good workout because I kept changing my routine.
Anyways, long enough intro...
Just like my work out, I'm working on different projects.
I just finished the halter top from Oliver + S today while I was fitting my coat (jacket) from BurdaStyle Handbook.
And since I got my new fabric shipment from www.fabric.com today,
So now I'm working on Vogue 1236 because one of the fabric might just be perfect for it.
Each will be blogged separately...
Oliver + S free halter top pattern
I had a left over cotton lawn from my tierred dress, so I made a top for my daughter.
I found a free pattern from Oliver + S.
I guess I got used to the accurate Burda patterns... Although the Oliver+S instruction was very thorough (yea, definitely, compared to Burda patterns...), I still had some trouble over it...
Well, there probably wasn't anything wrong with the pattern, I should just say it just differed from my preference.
First of all I didn't know if it included seam allowance?
Maybe I just missed it in the instruction...
The pattern looked big enough so I just cut it as is, without including the seam allowance.
Then i thought the ruffles could be a little longer. When I attached the second ruffles it barely overlapped, tha I knew it would show the stitches when it's on my daughter and she moves. (and she MOVES! She just learned how to run.)
I hadd to adjust ruffle attachment, and as a result I had to cut the lining a little shorter as it was alot longer and it showed below the ruffles.
I also was iffy on how the front and the back were attached. It finished the hem front and back separately, and then the side seams were stitched.
I just like stitching the side seam first and then finished the hem in one continuous hem.
In addition, I made the back top as a casing and inserted an elastic.
After finishing the top and tried it on my daughter, the back was too big and gaping.
Maybe it's just too big on her, as the pattern is for 2T and my daughter is only one.
But she got such a buddha belly that anything smaller than 18mo will be too tight in the mid section. Haha
Overall I still liked this pattern... It was FREE! :)
And the pattern covers various sizes, that I can use it for my older relative kids.
My complaints are easily fixable.

February 23, 2012
Burda Magazine 4/2011 Tierred Dress #110

This was another "let's-do-something-with-my-stash" project.
I was originally gonna make a wrap dress with this crinkle cotton lawn, but when I got this fabric it was just way too pink.
I thought the pink would be overwhelming as a wrap dress, so I looked for an alternative.
I think it is still an overwhelming pink... But it looks more spring-y or summer-y.
This dress will probably be better with more lighter fabric like a chiffon, as it's suggested in the magazine.
It's pretty heavy with the lawn.
Here's my review on www.sewing.patternreview.com, rather than repeating everything on the blog!
Pattern Sizing: 36-44
Did it look like the photo/drawing on the pattern envelope once you were done sewing with it? Yes except mine is shorter
Were the instructions easy to follow? They were ok, I thought they skipped some details... Like whenyou attach the straps, they just say "attach straps." but you have to remember to attach the straps to the right side of the bodice, edges together, so when you turn over the layers they the edges will be tucked in. (does it make sense?) So I wouldn't recommend this as your first project.
Also, they tell you to stitch some (2nd, 4th, 6th etc) flounces to one continuous piece... I was wondering "why only some pieces?" but it's because on their cutting suggestion, some pieces are cut in one piece and some were cut in two pieces. Just remember all of them should be in one continuous piece.
What did you particularly like or dislike about the pattern? I like how this dress is fitting even though it has volume with al the flounces. (it's actually heavy!)
Fabric Used: crinkled cotton lawn
Pattern alterations or any design changes you made: i made the skirt shorter. Although it's really cute as a maxi dress I thought it's too heavy for my height.
Would you sew it again? Would you recommend it to others? I might sew it again when it gets closer to summer. It's a really cute dress. But next time I'll use lighter fabric, maybe chiffon. Also I would probably pick more subtle print (or no print) and color. The design is so romantic, I think this pink was overboard.
Burda Magazine 3/2010 Dress/Top #111


I had some mesh fabrics in my stash, and I really didn't know what to do... Until I saw this dress on Burda issue 3/2010.
I thought the red/navy pattern was perfect print for a kimono style.
After I made the dress, I thought it would also work well with the other black mesh fabric
But I felt the dress was too dressy for everyday use, so I decided to make a top.
It wasn't too difficult to make.
I made straight size 37 without making any muslin, since Burda patterns have been fitting me good.
Although my waist is a little bigger than size 37, I thought it would be ok because of the loose fiting design.
The only place I had a troule was the neck facing...
Not because the pattern's fault, but because of the fabric choice I made.
This mesh was hard to press, so I had the hard time having it stay without the edges flaring out.
As for the black top, I caught some bodice fabric in the process, so I had to rip the stitches apart, which ended up with a hole...
I got so frustrated that I almost tossed it in the trash...
But I ate my lunch, became content, and got back on it again.
I just stitched up the hole, and it was hardly noticeable.
In conclusion...
I love these dress/top! They are very comfortable to wear.
I thought the mesh would be see through, but it wasn't that bad.
I can at least wear it around the house with no cami or peticoat underneath.
As for the black top, it has become one of my favorite top.
I just hope it's not out of style, since it is from 2010!
February 22, 2012
Burda 4/2012 preview

I just got my Burda 3/2012 yesterday.
Yey! It's my first issue on my subscription.
I like this issue, since it has the spring theme and more airy.
They always have a preview at the end of the magazine, and I'm excited for the next isue already!
I like the designer dress, and also the other ones that are leaning more to summer.
Although it's been rainy and cool here in Hawaii recently, it's still no-sleeve weather!
February 21, 2012
A dress for my sister-in-law

My sister-in-law asked me to make a bridesmaids dress for her friend's wedding.
Whoa, I'm honored!
She asked me if I can make something like a black dress in the picture.
I thought it looks like Butterick 5319 that I have used in the past (and never really completed. :p), just a matter of lengthening the skirt and adding the sleeves.
Hmm... just don't know how to attach these sleeves... is that a flounce?
February 17, 2012
Burda Magazine 3/2010 dress#111
I'm constantly impressed with Burda patterns.
i love how all the lengths match up, etc.
So I finally got an use out of the mesh fabric I had in my stash.
I used dress #111 from 3/2010.
As I saw in some reviews, this was a fast, easy project.
It also helped that this mesh doesn't fray, so I didn't need to serge the edges.
Just cut and stitch!
The only part I had a problem with was the neck facings.
After I attached it to the wrong side of the bodice, I flipped iver and had a hard time topstitching (edgestitching?) without getting wonky. :(
But because of the busy print, you can't tell. Luckily.
The neck was pretty low, but since it's a mesh and I'll need to wear something underneath anyways, I didn't mind.
But if I were to make this in a non-see through material, I'll probably bring up the neck.
Although it turned out nice, I don't think this mesh, or the print was a right fit for this pattern.
It really looks like a kimono ROBE.
Yup it looks like I should be wearing it at night in bed reading a book or something...
Picture to be posted later...
I still need to finish the hems. :p
February 13, 2012
Stabilizer my...
I decided to try applique.
It all started when I found a black interlock knit in my stash.
I tried to make McCalls cowl neck top, but it was too thick and didn't drape right.
I figued I'll come back to it one day...
I was cleaning out my stash, and tried different patterns...
At first I wanted to make another pants for my son, but it wasn't enough.
Then I found out it was enough to make another long sleeve for my daughter.
But it's black...
I don't want my one year old daughter to be wearing all black already!
How can I make it "cute"?
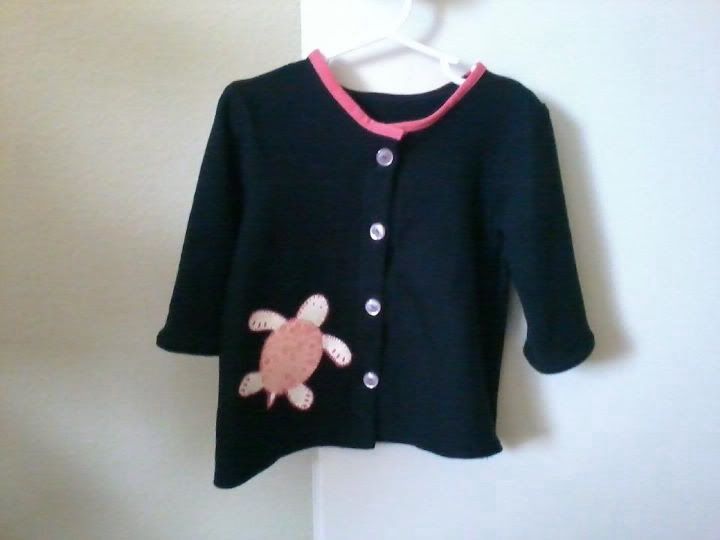
At first I was just going to add pink neck binding or something, and while I was looking through my scrap stash I found my daughter's baby onesie with a turtle on it.
I thought it would be really cute to applique this, and add matching orange neck binding and buttons.
Woooo, I was excited!
So I searched the internet and gave it a try.
I fused the heat bond and attached the turtle on the front piece.
I was brave to do my first applique job on a knit.
As suggested, I pinned the tear-away stabilizer onto the back of the fabric and started sewing...
Well.
The turtle was made of some kind of plasticky, sticky material.
So the presser foot was getting stuck and didn't want to move.
Do I give up? No!
I ended up moving the fabric after every stitch.
As a result. The stitches aren't close together as it would've been if the machine sewed it, but it looked ok.
It looks more like a hand stitch and gives it a little cute-sy feel.
The problem was the stabilizer...
I teared it off, but alot of them were stuck under the stitches, and I spent at least half an hour taking the tiny pieces off using a tweezer. :(
Then I found out there's such thing as wash-away stabilizer.
Grrrrrrrrrrrr......
Why do they even make a tear away?
It's like unfitted sheets,,, why even make them???
It was closed to 10pm but I pushed myself to make buttonholes on the front piece.
This time I remember to add an interfacing, so it made a nice buttonhole easily with my Janome.
Nice second buttonhole....
Then the bobbin thread ran out in the middle of the third one.
Grrrrrrrrrr!!!!
The thing with automatic bottonhole making function is, I cannot start in the middle of the process.
I chanced myself to make a new hole over the last half hole...
Then it got tangled.
I decided I'll just work on this tomorrow, so i'll make the fourth, last hole...
Tangled again!!
At this point, I decided to just stop all together.
Let it go, and start fresh tomorrow.
Lesson learned,,, don't push yourself late at night!!!
2/14/2011
I fixed the buttonhole and got to finish it.
I think it turned out really cute... Yeah?
It all started when I found a black interlock knit in my stash.
I tried to make McCalls cowl neck top, but it was too thick and didn't drape right.
I figued I'll come back to it one day...
I was cleaning out my stash, and tried different patterns...
At first I wanted to make another pants for my son, but it wasn't enough.
Then I found out it was enough to make another long sleeve for my daughter.
But it's black...
I don't want my one year old daughter to be wearing all black already!
How can I make it "cute"?
At first I was just going to add pink neck binding or something, and while I was looking through my scrap stash I found my daughter's baby onesie with a turtle on it.
I thought it would be really cute to applique this, and add matching orange neck binding and buttons.
Woooo, I was excited!
So I searched the internet and gave it a try.
I fused the heat bond and attached the turtle on the front piece.
I was brave to do my first applique job on a knit.
As suggested, I pinned the tear-away stabilizer onto the back of the fabric and started sewing...
Well.
The turtle was made of some kind of plasticky, sticky material.
So the presser foot was getting stuck and didn't want to move.
Do I give up? No!
I ended up moving the fabric after every stitch.
As a result. The stitches aren't close together as it would've been if the machine sewed it, but it looked ok.
It looks more like a hand stitch and gives it a little cute-sy feel.
The problem was the stabilizer...
I teared it off, but alot of them were stuck under the stitches, and I spent at least half an hour taking the tiny pieces off using a tweezer. :(
Then I found out there's such thing as wash-away stabilizer.
Grrrrrrrrrrrr......
Why do they even make a tear away?
It's like unfitted sheets,,, why even make them???
It was closed to 10pm but I pushed myself to make buttonholes on the front piece.
This time I remember to add an interfacing, so it made a nice buttonhole easily with my Janome.
Nice second buttonhole....
Then the bobbin thread ran out in the middle of the third one.
Grrrrrrrrrr!!!!
The thing with automatic bottonhole making function is, I cannot start in the middle of the process.
I chanced myself to make a new hole over the last half hole...
Then it got tangled.
I decided I'll just work on this tomorrow, so i'll make the fourth, last hole...
Tangled again!!
At this point, I decided to just stop all together.
Let it go, and start fresh tomorrow.
Lesson learned,,, don't push yourself late at night!!!
2/14/2011
I fixed the buttonhole and got to finish it.
I think it turned out really cute... Yeah?
February 11, 2012
Upcycling
It's been pretty chilly here in Hawaii.
Ok, 75F really cold to us cold wussies.
I think this year has been really cold.
I don't remember my son wearing pants or jackets this often last year.
So ever since my daught was born last year, I haven't bought any long sleeves for my daughter.
She has gotten some as a gift but they are all still too big for her.
I think the only thing she has is a sweater cardigan, and that's what she wore to sleep few nights ago when the temperature was dipping by the time she went to sleep.
So i decided to make some pajama top for her.
I was debating if I want to make her a cotton jacket that she can throw on when it gets cold during the day, but I figured it's the coldest at night and I want her to sleep warm and comfortably.
She's been sleeping in her short sleeves, and I was constantly putting a blanket on her because she hates blankets and just kicks it off.
Ok, maybe this top was for me... So I don't have to worry about keep putting a blanket on her!
So I used two knit receiving blankets from when she was little that we no longer use.
Or should I say that she never used... We got them as a gift but she still had so much stuff from her brother when he was a baby, so we never got to them.
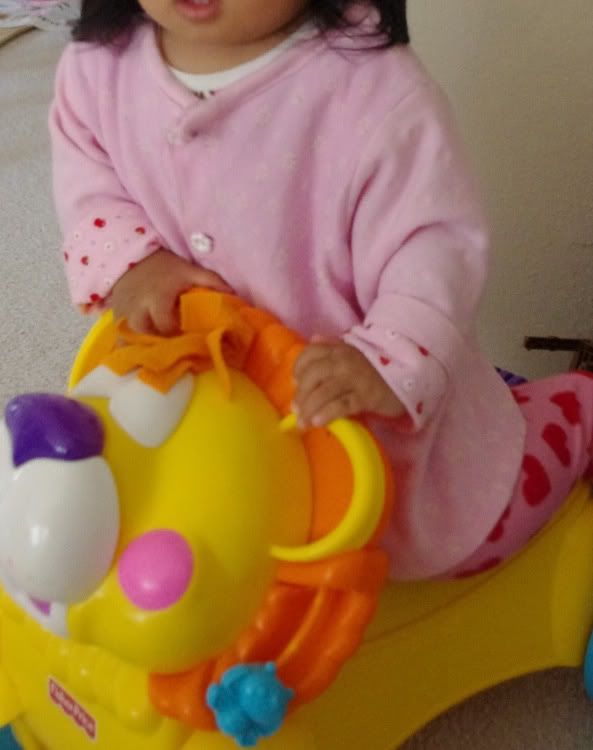
I forgot to take a picture of it, but they are both pink, one in a daisy flower print, and the other in apple print.
Neither of them were big enough to make a long sleeve top, so I decided to use the flower one as a bodice, and the back of apples (solid pink) as sleeves.
I thought the apples print was too loud.
It turned out ok except for my HUGE mistake.
After i finished sewing it up, it was time to make buttonholes.
I used the automatic buttonhole button on my Janome, and the fabric got eaten up.... Aaaaaaaagh!!!
I realized I should have attached some interfacing around the button area.
For that matter, the entire facing... Since my daught is only one, she pulls on to her shirt as hard as she can so she can look at the buttons closely. :p
Anyways It almost cut up the facing, but barely survived.
I thought about putting some kind of a tape in the back to stabilize it and take it off later, but decided to just make the buttonholes by hand sewing.
It's not as nice as the machine finish, but I really didn't want to mess up another hole and ruin the entire top.
It's still wearable and my daughter likes it. At least she got to sleep comfortably in her long sleeve top!
By the way, the sleeves were too long and I just folded up, but it ends up showing the apple prints, and I think it looks cute. :)
I should've finished the neck binding with the print size to match it. :p
February 10, 2012
Almost a wadder
This is from BurdaStyle magazine 6/2011, #101.
After I made one with charmeuse, I loved it so I decided to make it in linen, with its own sleeves.
Well.
The pattern I thought fit me didn't.
It turned out too tight, probably because I made it in linen, not the stretch material.
I should probably have cut it in bias as suggested.
The sleeves were so tight, since I have big arms for my body.
I didn't really know how to fix it, as armcycle was fitting me fine, just the sleeve hems.
I tried to fix it maybe twice, but the more I fix, the more I cut into the armcycle instead of ripping the seams, so armcycle was getting wider and wider.
After two attempts, I decided to give up on the sleeves.
On top of it, i did such a bad job on the neck facing...
I did in wrong order. I attached the front neck facing to the bodice, then attached the back facing to the front facing, and attached the back facing to the bodice.
My top stitch was just all over the place, sometimes not even on the facing.
What I should've done was, I should've attached the front AND back neck facings to the bodice together, then attach eachother at the top.
I thought about throwing it into the wadder-don't even think about wearing it-pile, but thought maybe I can just use it as a sleeveless.
And it worked! It still fits!
It's now just my bad topstitching job, but I figured nobody's gonna notice small off-stitchings on my clothes.
The thread is the same color as the fabric so it's hard to see.
(plus my long hair covers that area)
I still wear it and it's pretty comfortable.
However unlike my charmeuse, I have to wear a cami underneath, since this linen is fairly sheer, and also my neckline was lower than expected.
So this was an almost wadder, but was saved!
Subscribe to:
Posts (Atom)