January 26, 2010
Etsy
This is like the best site idea for crafters!!!
I know so many crafters are just happy to make things - but make too many - and what do we do with it?
I'm sure my friends/coworkers are tired of seeing my handmade stuff... although it's not like I'm charging them anything... I just love making things.
For those of us... put it up on Etsy! :)
I first sold some gemstone beads that was just sitting around in my closet...
They're perfectly good beads, including turquoise, rhodenite, moonstone, etc.
Then the payment was put into my PayPal account...
This is my "play" account.
If I use this money to post my items to Etsy, their listing fee ($0.20) doesn't seem too bad, even if they don't sell.
I put up my placemat purse, and some of the jewelries that I've made...
I'm not sure if I get any "hits", but it's ok. I would be happy if anyone ever buys my handmade stuff. :)
January 22, 2010
Placemat Purse - Tutorial
Here's the tutorial. ...More like a report on what I did, but hopefully someone can follow!
First, get the materials ready.
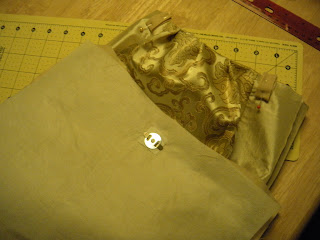
This is the placemat to be used...

Prepare the inside fabric. The placemat is 15(w) x 11(L) inches.
After making the pleats on the placemat, the dimention became 12(w) x 11(L) inches, so I cut the sides off to match the shape. (Measured 6 inches from the top center to the right & left, and drew a diagnal line to the bottom corners)

When I layer the outer fabric (Placemat) after the pleats were made, there's a little curve... I traced and cut it off the inner material, so it matches the shape.
The next step gives a depth to the bottom of the purse. This is hard to explain, but hope you get it from the picture.
Fold the bottom edges into a triangle. Mark 1 inch to the both sides from the center line. Stitch this line.
Leave about 1/3 inch from the stitch, and cut the edge off. Do the same for both bottom corners, on both inner and outer fabric.
Prepare the ribbon (? what do you call this?) to hold the handles. Cut 2 x 10 inches material.

Press, and cut it in 4 pieces.
About 2 inches from the edge of outer fabric, fold the ribbon in half and pin them on.
Assemble the outer and inner fabric together. Put the outer fabric (placemats) in the inner fabric, right sides together.
Stitch the top of the layers together.
From the hole made on inner material, pull the outer material out.
Completely out.
Close the hole.
Put the inner material nicely into the outer purse, and top stitch the top edge.
Attach handles...
And VOILA!! The placemat purse is done!!!
Doesn't even look like it's made of placemats, huh? :)
*You're welcome to use this tutorial - but please limit to personal use only.
January 20, 2010
Placemat Purse - Maybe a tutorial?

I have a pretty placemat that my auntie gave me.
It's like a set of 6, but we don't really have any opportunity to use this.
Then I thought... Why don't I use this to make a purse?? :)
And to thank all the people that I've used tutorials from... Can I give back something, maybe by posting a tutorial myself?
Ok, I'm still a rookie on sewing, and this will be my first tutorial...
And since I'm planning a first birthday party for my little dragon this month, I don't know when I'll even finish it... But I'll try!
January 9, 2010
New bag project
My new bag project.
I want to make a diaper bag for my friend who's expecting a baby boy at the end of this month.
Basically a simple shoulder bag, with lots of pockets inside, preferrably with an elastic band.
It shouldn't be too hard...
I wish I knew how to make these bags while I was pregnant.
I would've been making my own diaper bag!
Now I'm off to finding her a nice fabric!
I want something simple & turquoise outside, and inside fabric is this new hawaiian girl pattern that I saw...
UPDATE: 1/20/2010
My friend already had her baby.
Thank goodness the bag was already done! :)
Here're some pictures.
Front

Back

Lots of pockets inside... with elastic bands to fit different size of things... I even made pockets for pens! Don't you hate looking for pens all over your purse?

She loved it... yey! :)
January 5, 2010
Bathroom ideas
Over the holidays, I was in CA to visit my husband's family.
I'm originally from CA, so I also saw my bestfriend.
She has recently bought a house.
What a timing. She bought her house for about $450K brand new, when it was about $800K at the peak. LUCKY!
Well, it seems like we'll be at our townhome for awhile.
Inspired from my friend's house, I was thinking about doing a little decorating around the house.
I especially liked her bathrooms...
Granite tops with bronze hardware.
I don't think we can "remodel" the entire bathroom, but maybe we can just change the hardware?
I looked up the towel bars and stuff, and found out they were about $20-30/piece!!
Whoa! Easy $100 just change the hardware. Times X2, since we have 2 bathrooms.
Home Depot had a set for $36.99, which isn't bad... but they don't ship them to Hawaii. Of course. (-_-;)


